| Using HomeSite |
|
|
Chapter 4 Learning HTML and CSS |
|
HTML tables allow for more interesting and precise page compositions. Tables are relatively complex compared to the other tags covered so far, so it's worth spending some time on tables in general before looking at the specific table design in the Archaeology Tours page.
HTML tables are built in the Table <TABLE></TABLE> tag. The table's basic structure is defined by table row <TR>...</TR> tags. Inside table rows are table cells, marked with table data <TD></TD> tags. You can also use table header tags <TH></TH>, which are identical to table data tags except that the text is bolded and centered horizontally in the data cell by default.
You can cause table data or table headers to span rows or columns by using the ROWSPAN and COLSPAN attributes, which produce effects similar to merging cells in a spreadsheet or word processor table.
| Tip | The online HTML Reference contains a detailed section on tables, including examples and information on browser inconsistencies in rendering table code. If you plan to support multiple browsers, you will need to test the table code in those browsers. |
There are a number of other attributes that can be used within the <TABLE> tag. The following table lists the most important table attributes.
| Tag | Attribute | Effect |
|---|---|---|
|
TABLE |
CELLSPACING=pixel value |
Sets the distance between the edges of cells. |
|
CELLPADDING=pixel value |
Sets the distance between edges of cells and their contents. | |
|
BORDER=pixel value |
Draws a border of a specified width around all cells and the entire table. | |
|
BGCOLOR=color |
Specifies a background color for the entire table. | |
|
TD, TH, TR |
ALIGN=Left, Right, or Center |
Aligns the contents of the data cell or row horizontally. |
|
VALIGN=Top, Middle, or Bottom |
Aligns the contents of the data cell or row vertically. | |
|
BGCOLOR=color |
Specifies a background color for the data cell or row. |
| To build the Archaeology Tours table: |

The Table Wizard opens with the default table layout of two columns by two rows.
Color-coding shows the cell now fills the entire left column.
The code should look like this:
<TABLE CELLSPACING="0" CELLPADDING="3" BORDER="1">
<TR>
    <TD ROWSPAN="2"></TD>
    <TD ALIGN="center"></TD>
</TR>
<TR>
    <TD ALIGN="center"></TD>
</TR>
</TABLE>
Notice how HomeSite indents the <TR> and <TD> blocks in the code above. This coding convention makes it easier to see the table structure. This hierarchical display of table elements is coded by nesting the row and cell tags within the table tag.
In the following procedures, you'll add text and formatting to the table cells.
Content for HTML tables is entered in the table cells using the table data <TD> and table header <TH> tags.
Table text is formatted in the same way as paragraph text, by coding the <FONT> tag.
| To enter text in table cells: |
<TD></TD> tags in the line that contains the ROWSPAN="2" attribute.
<TD ROWSPAN="2"><P></P></TD>
The text is inserted in the paragraph. The code now looks like this:
<TD ROWSPAN="3"><P>Welcome to Archaeology Tours, the first choice of
travelers and adventurers. Our Mediterranean Cruise features
luxury accommodations, with stops in the following ancient
cities:</P></TD>
The rest of the content of this cell consists of a bulleted list, which we'll get to a bit later. First, let's format the cells in the right column, beginning in the top cell.
After you create a table with the Table Wizard, you can refine the layout by editing the properties of its individual elements. To change these properties, use the <TR> and <TD> tag editors.
| To format table cells: |
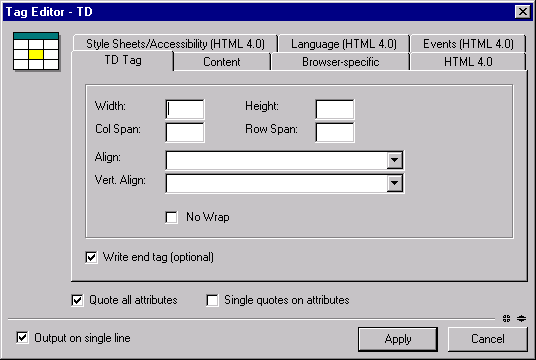
<TD> tag that follows the <TD> containing the Welcome text and select Edit Tag.
The alignment value you set in the Table Wizard is displayed in the tag editor.

The code for the entire table should look like this:
<TABLE CELLSPACING="0" CELLPADDING="3" BORDER="1">
<TR>
    <TD ROWSPAN="2"><P>Welcome to Archaeology Tours, the first choice of
    travelers and adventurers. Our Mediterranean Cruise features luxury
    accommodations, with stops in the following ancient cities:</P></TD>
    <TD ALIGN="center" BGCOLOR="Yellow"></TD>
</TR>
<TR>
    <TD ALIGN="center" BGCOLOR="Lime"></TD>
</TR>
</TABLE>
If those colored cells in the left column look a bit small, don't worry. We'll size them by putting text in them.
Hyperlinks, or links, are the heart of the World Wide Web. They enable you to move from page to page and they provide the connections between Web pages and other resources.
Links are created with the Anchor <A></A> tag and always include the HREF attribute, which specifies the page to which you are linking. Links are usually identified on a page by special link text formatting, such as a distinct color or underlining. Many sites also use images that are as links.
Unlike the Allaire link you coded earlier, these next links are to documents in the file system and do not require the http://www prefix.
In this section, you will learn two ways to add hyperlinks.
| To insert a hyperlink using the Anchor dialog box: |
<TD></TD> tags for the top right cell (the cell with the Yellow background) and enter the text Purchase Cruise Tickets.
The selected text appears in the Description box.

The table cell tag looks like this:
    <TD ALIGN="CENTER" BGCOLOR="Yellow">
        <A HREF="tickets.htm"><B>Purchase Cruise Tickets</B></A>
    </TD>
| To insert a hyperlink using drag and drop: |
map.htm file from the tutorial files folder and release the mouse button between the <TD></TD> tags for the bottom right cell (the cell with the Lime background).
The link text is filled in for you from the contents of the map.htm <TITLE> tag.
The code looks like this:
    <TD ALIGN="CENTER" BGCOLOR="Lime">
        <A HREF="map.htm"><B>Purchase Cruise Tickets</B></A>
    </TD>
In the next section, you complete the table text by creating a list.